
I've swapped buckles on a couple of my Engineer Boots in the past and the most recent was done using my custom roller buckles on the Wesco MP toes given to me, for gratis. Following this swap, I received and influx of e-mails requesting a step-by-step tutorial.
In this post, I'll try my best to walk those who are interested through my process.

Tools:
- Seam Ripper
- Scissors
- Midlde to heavyweight thread*
- Two needles - Leather needles are prescribed, but heavier grade fabric needles you may have laying around will work just as well for this small project, especially since the holes already exist. Be sure not to accidentally poke new holes.
- Small flashlight
- Lots of patience
*Nylon, linen and polyester threads are all acceptable choices. Waxing the thread with beesewax or parrafin isn't necessary, but it is supposed to help with long-term durability and allows the needle to ease through the holes. I was once a waxer, but realized that it gives my projects a messy look. I now use an exclusive heavy-duty wound thread from Japan on all my projects.

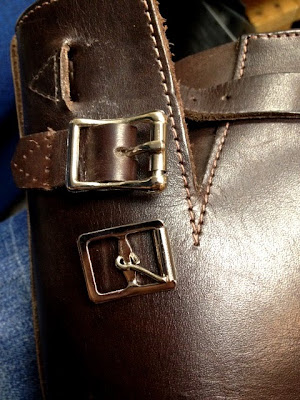
This photo shows the factory stitching and the bulky, unattractive harness buckles.

Not all buckle retainers have leather that tucks under itself, so carefully unpick the stitching while being mindful not to remove more stitching than necessary. Absolutely do not touch any vamp or heel counter stitching. It's important to take it slow during this process, especially because it is simple to accidentally scratch/cut the leather.
Once the necessary stitching is undone and the area cleaned/cleared of the old thread, replace the buckle and lay the leather back to its original position. It's not necessary to perfectly line up the existing holes at this point as some shifting may occur throughout the process - after each re-stitch - constant realignment will be required. Remember, take it slow and put your patience on.
Thread your needles as shown here. Ensure the top buckle is undone in order to allow for maximum sewing room. Begin your saddle stitching by starting at the existing hole at the corner of the buckle retainer nearest the upper most portion of the heel counter and work your way clockwise.

What's with the flashlight? As you can see, the shaft on these boots are tall and when peering down towards the sewing area, its difficult to see where you're poking through the leather. I dropped the flashlight backwards down the boots to illuminate that area.


The completed instep buckle

You'll be super happy when getting to this point where you don't have to reach too far. The upper buckle retainer is glued together and in place, but I never re-glue it when swapping the buckles.

Unpick from the inside so as not to inadvertently scratch/cut the outer leather.

If you're in the market for some great new roller buckles as featured on this post, they can purchased on my Etsy page.


.JPG)
.JPG)
No comments:
Post a Comment